17 Chocolate Glazed Nail Ideas to Satisfy Your Winter Sweet Tooth

If you've been scrolling through your feed lately, you've probably noticed something delicious happening in the beauty world. Chrome manicures got a major glow-up when Hailey Bieber made her glazed donut nails go viral. Now, that same luxe finish has evolved into something even more cozy and perfect for the colder months.
Brown shades are having their moment—and honestly, it's about time. There's something so understated yet elevated about a rich brown paired with that signature chrome finish. It feels luxurious without trying too hard.

Think of it as wrapping your hands in your favorite sweater. These chocolate-inspired manis bring that same comforting vibe we all crave when temperatures drop. They're sophisticated enough for work meetings but fun enough to make you smile every time you catch a glimpse of your fingertips.
The best part? This look works for everyone. Whether you're a minimalist who loves subtle elegance or someone who enjoys a bit of glamour, this style hits that sweet spot between everyday wearable and totally special.
Key Takeaways
- Chrome finishes transformed from glazed donut to chocolate variations, creating a cozy winter aesthetic
- Brown shades are trending as an understated yet elevated alternative to traditional manicure colors
- The combination of rich brown tones with luxe chrome creates a sophisticated, wearable look
- Chocolate-glazed styles offer comfort and indulgence perfect for colder months
- This manicure trend balances everyday practicality with special occasion glamour
What Makes Chocolate Glazed Nails the Perfect Winter Trend
Chocolate glazed nails aren't just another passing trend—they're the perfect answer to winter's call for warmth, sophistication, and just a touch of indulgence. Think about it: when the temperature drops and everything outside turns gray and bare, your nails can bring that cozy, comforting vibe that makes you feel put-together without trying too hard.
Here's the thing about brown nail designs—they've come such a long way from being dismissed as "boring" or "too neutral." What used to be considered a safe, forgettable choice has transformed into an intentional style statement that screams sophistication. The rich chocolate tones paired with that luxurious chrome-like finish create something truly special.
It's understated yet elevated at the same time. You know that feeling when you find the perfect leather jacket or cashmere sweater? That's what chocolate glazed nails do for your hands.

The psychology behind brown tones is fascinating too. While reds and burgundies demand attention, chocolate browns offer a sense of warmth and stability that feels especially comforting during winter months. There's something grounding about these shades that makes them feel right when you're bundling up in cozy sweaters and sipping hot cocoa.
Glossy brown nails work with literally everything in your winter wardrobe. Seriously—try to find something they don't complement. Whether you're wearing classic black, cozy creams, deep forest greens, or even bold winter whites, chocolate glazed nails tie your whole look together seamlessly.
The glazed effect is where the magic really happens. That high-shine, almost glass-like finish catches the light beautifully on those gray winter days when we all need a little extra sparkle. It's luxurious without being flashy, polished without being stuffy.
Multiple ways exist to rock this look, which is part of its beauty. You can go full chocolate glaze for a sleek, minimalist vibe. Or add metallic accents for holiday parties. Mix different chocolate tones for depth. The versatility is honestly unmatched.
Let's talk about seasonal appropriateness for a second. Some nail trends feel forced during certain times of year, but brown nail designs just feel right when it's cold outside. They match the energy of the season—cozy, rich, and comforting. It's like your nails are wearing the equivalent of your favorite winter boots.
The practical side matters too. Chocolate shades are incredibly forgiving when it comes to minor imperfections or small chips. Unlike stark whites or bright colors that show every flaw, these deeper tones hide wear and tear much better, meaning your manicure looks fresh longer.
Glossy brown nails also have this amazing ability to make your hands look elegant and cared-for without screaming for attention. In professional settings, they read as polished and appropriate. At holiday parties, they feel festive without being costume-y. For everyday errands, they make you feel more put-together than you might actually be (we've all been there).
The way these shades complement winter skin tones deserves special mention. When you're dealing with less sun exposure and that natural winter paleness, chocolate glazed nails add warmth back to your overall appearance. They create a beautiful contrast that's flattering rather than harsh.
And can we talk about how amazing glossy brown nails look in photos? Holiday gatherings mean lots of pictures, and this trend photographs incredibly well. The high-shine finish catches camera light perfectly, making your hands look manicured and intentional in every shot. No weird color distortion or harsh contrast—just gorgeous, polished nails that enhance rather than distract.
The best part? This look doesn't feel like you're trying too hard. It has that effortless cool-girl vibe that says you care about details but you're not obsessed. Practical meets beautiful—which is exactly what we all need during the busy winter season.
Whether you're heading to the office, running holiday errands, or attending festive celebrations, chocolate glazed nails work for every occasion. They're sophisticated enough for important meetings yet cozy enough for weekend coffee dates. That kind of versatility is rare in nail trends, and it's exactly why this look deserves a permanent spot in your winter beauty rotation.
Essential Products and Tools for Chocolate Glazed Manicures
Here's the truth about creating chocolate glazed nails: you don't need a million products, just the right ones. I've watched so many friends get overwhelmed browsing beauty aisles, thinking they need every single item on display. But the reality? A chocolate glazed manicure comes down to three essential categories—quality polish in the perfect shade, a top coat that delivers that signature shine, and the basic prep tools that set you up for success.
Think of it like baking (staying with our sweet theme here). You wouldn't try making chocolate brownies without cocoa, right? Same principle applies to your nails. The foundation matters, and choosing products specifically designed for what you're trying to achieve makes everything easier.

Chocolate Brown Polish Shades to Consider
Let's start with the star of the show—the chocolate brown nail color itself. Not all browns are created equal, and finding your perfect shade makes all the difference. The chocolate family ranges from creamy milk chocolate tones to deep, almost-black dark chocolate hues.
If you have lighter skin tones, milk chocolate and medium cocoa shades tend to be incredibly flattering. Look for polishes labeled with terms like "caramel," "latte," or "chestnut"—these warmer browns complement lighter complexions beautifully without washing you out.
For medium to olive skin tones, you've got the widest range to play with. Rich espresso, true chocolate, and warm truffle shades all look stunning. These deeper tones create gorgeous contrast while still feeling sophisticated and wearable.
Darker skin tones absolutely shine in deep chocolate shades. Look for descriptions like "dark cocoa," "espresso bean," or "bittersweet chocolate." These intense shades provide beautiful dimension without disappearing against your natural skin tone.
When shopping for sweet-inspired nail polish, pay attention to the formula quality. A good chocolate brown should be richly pigmented so you're not painting on five coats to get opacity. Test the brush if possible—wider brushes make application easier and more even, especially if you're doing this at home.
Some quality indicators to look for include creamy consistency (not too thick or watery), smooth application without streaking, and a formula that levels itself on the nail. If a polish description mentions "one-coat coverage" or "high-pigment formula," those are good signs you're looking at quality.
Top Coats for Achieving the Glazed Effect
Okay, this is where the magic happens—where regular chocolate nails transform into that drool-worthy glazed look. The glazed donut effect isn't just about shine; it's about creating a specific wet-look, almost-glass-like finish that catches light beautifully.
Regular glossy top coats will give you shine, sure, but they won't create that signature glazed appearance. You need a top coat specifically formulated for high-gloss, reflective finish. Look for products labeled as "ultra-shine," "glass-finish," or "glazed effect" top coats.
Here's what separates glazed-effect top coats from regular ones:
- Enhanced light reflection: These formulas contain special polymers that bounce light differently, creating that wet appearance
- Thicker consistency: Slightly thicker formulas help build that dimensional, glassy look
- Self-leveling properties: Quality glazed top coats smooth themselves out, eliminating brush strokes
- Long-lasting shine: The finish should maintain its glossiness for days, not dull after one hand-washing
Some people layer a chrome powder between color and top coat for extra dimension. If you're going this route, you'll need a no-wipe gel top coat to apply the powder to, then seal it with your final glossy layer. It's an extra step, but the mirror-like finish can be absolutely stunning.
For those sticking with traditional polish (not gel), make sure your top coat is compatible with your base color. Some quick-dry top coats can actually dull certain polish finishes, so test them together first or stick with products from the same brand family.
Nail Preparation Tools
Listen—I know prep work isn't the fun part. But I've learned the hard way that proper nail preparation is what separates a manicure that lasts two days from one that looks fresh for two weeks. You don't need a professional setup, just a few key tools.
Here are the actual essentials (not the hundred things influencers try to sell you):
- Nail file (180-240 grit): This is your shaping tool. Medium grit works for most natural nails without being too harsh. Glass files are gentler and last forever.
- Buffer block: Gently smooths the nail surface so polish adheres better and looks more even. Don't over-buff—light passes are all you need.
- Cuticle pusher: Metal or wooden, this pushes back cuticles for a clean application area. Never cut cuticles—just gently push them back.
- Cuticle oil or cream: Hydrated cuticles make the entire manicure look more polished and professional.
- Base coat: This is non-negotiable. Base coat protects your natural nails from staining (chocolate browns can stain) and helps polish adhere better.
You probably already have most of these lying around. If you're building a kit from scratch, invest in quality over quantity. One good nail file beats five cheap ones that fall apart.
A couple of bonus tools that make life easier: nail polish remover (acetone-free is gentler), cotton pads or lint-free wipes, and a small clean-up brush dipped in remover for fixing mistakes around your cuticles. That last one is a total game-changer for achieving that salon-clean look at home.
The bottom line? You don't need to spend a fortune or own every product ever made. Focus on quality chocolate brown shades that suit your skin tone, a proper glazed-effect top coat, and the basic prep tools that create a smooth canvas. Get these essentials right, and you're already 90% of the way to gorgeous chocolate glazed nails.
17 Chocolate Glazed Nail Ideas to Satisfy Your Winter Sweet Tooth

From milk chocolate sweetness to dark chocolate drama, these nail designs capture every shade of indulgence. We've rounded up seventeen stunning chocolate-glazed manicure ideas that'll make your fingers look good enough to eat. Whether you're after something simple and classic or ready to experiment with textures and accents, there's a perfect winter nail art look waiting for you here.
Think of this collection as your personal chocolate box of manicure inspiration. Each design brings its own personality and vibe to the table. Some are perfect for everyday wear, while others shine brightest at special occasions.
Classic Chocolate Glazed Looks
Sometimes the most beautiful manicures are the simplest ones. These foundational chocolate glazed styles prove that you don't need complicated nail art to make a serious statement. They're timeless, versatile, and incredibly wearable for any occasion.
1. Milk Chocolate Glaze
This lighter brown shade with a high-shine finish feels warm and neutral at the same time. The milk chocolate glaze works beautifully for anyone who wants chocolate nails without going too dramatic. It's the perfect bridge between nude manicures and bolder color choices.
The soft brown tone complements virtually every skin tone. Pair it with cream sweaters and camel coats for that effortlessly chic winter aesthetic. This look takes about 20 minutes to achieve and works equally well on short or long nails.
2. Dark Chocolate Elegance
Rich, deep, and utterly sophisticated—dark chocolate nails command attention without screaming for it. This shade leans toward espresso territory with that signature glossy finish that catches light beautifully. It's perfect for evening events or when you want your manicure to feel a bit more dressed up.
Dark chocolate elegance pairs gorgeously with gold jewelry and warm metallics. The depth of color makes your nail beds appear longer and more elegant. This design works especially well on almond or stiletto-shaped nails where the drama really shines through.
3. White Chocolate Dream
Here's where things get interesting—white chocolate nails offer an unexpected twist on the chocolate theme. Think creamy ivory or warm vanilla tones with that same high-gloss finish. This lighter option feels fresh and modern while still maintaining those delicious glazed donut vibes.
White chocolate works wonderfully for daytime wear and professional settings. It brightens your overall look and pairs beautifully with winter whites and soft pastels. Add a touch of iridescent shimmer to the top coat for extra dimension.
Chocolate Nails with Metallic Accents
Ready to turn up the luxury factor? Adding metallic elements to your chocolate base creates cozy nail looks that feel special and celebratory. These designs strike that perfect balance between wearable and eye-catching.
4. Chocolate Gold Foil Design
Imagine your favorite chocolate base topped with irregular pieces of gold foil scattered across one or two accent nails. This design channels serious luxury vibes without requiring advanced nail art skills. The gold catches light differently than the glossy chocolate, creating beautiful contrast.
Place gold foil on your ring fingers for a subtle statement. Or go bold and add foil accents to every nail for maximum impact. This look photographs beautifully and adds instant elegance to any outfit.
5. Chocolate Bronze Shimmer
Bronze shimmer mixed into or layered over chocolate polish creates warmth and depth. This design has a slightly more subtle metallic effect than gold foil, making it perfect for those who want shimmer without too much shine. The bronze tones bring out golden undertones in the chocolate base.
Apply bronze shimmer polish as a gradient starting from the cuticle. Or mix it with your chocolate shade for an all-over shimmer effect. This design works beautifully for holiday gatherings and winter weddings.
6. Rose Gold Chocolate Combo
The feminine sophistication of rose gold meets rich chocolate in this stunning combination. Try chocolate on most nails with rose gold on accent nails, or add rose gold chrome powder over chocolate for a completely different finish. Either approach delivers that modern, romantic aesthetic everyone's after.
Rose gold brings a cooler metallic tone that creates beautiful contrast with warm chocolate shades. This combination flatters every skin tone and feels both trendy and timeless. Consider adding tiny rose gold studs or striping tape for extra detail.
Multi-Toned Chocolate Manicures
Why choose just one chocolate shade when you can have them all? These gradient and mixed-tone designs let you showcase the entire spectrum of chocolate colors in one gorgeous manicure. They're surprisingly easy to achieve with the right technique.
7. Chocolate Ombre Fade
Start with white chocolate at the cuticle and gradually fade to dark chocolate at the tips. This vertical gradient creates length and visual interest while showing off your blending skills. The ombre technique works on any nail length but really shines on longer nails.
Use a makeup sponge to dab on different chocolate shades for seamless blending. Seal everything with that signature glossy top coat. The result looks professionally done but only takes about 30 minutes once you get the hang of it.
8. Marble Chocolate Swirl
Mix milk, dark, and white chocolate shades together for a marbled effect that mimics actual chocolate swirls. No two nails will look exactly alike, giving your manicure that unique artisan quality. This design feels artistic without requiring steady hand precision.
Create marble effects using a dotting tool or toothpick to swirl colors together while they're still wet. The glossy top coat unifies all the different tones into one cohesive look. This winter nail art approach works beautifully for those who love something different on every finger.
9. Hot Chocolate Gradient
Picture the layers in a perfect cup of hot chocolate—that's what this gradient captures. Start with deep chocolate at the base, transition through milk chocolate in the middle, and finish with a creamy top that mimics foam or whipped cream. It's cozy, delicious-looking, and totally on-trend.
This horizontal gradient tells a story on each nail. The technique takes practice but delivers stunning results. Add tiny white dots on the lightest section to represent marshmallows for an extra playful touch.
Chocolate French Manicure Variations
The classic French manicure gets a delicious makeover with chocolate shades. These variations maintain that elegant, polished feeling while embracing the warmth and richness of chocolate tones. They're perfect for anyone who loves traditional nail styles with a modern twist.
10. Chocolate French Tips
Replace traditional white tips with rich chocolate brown for an unexpected take on the French manicure. Keep the base nude or go with sheer pink for contrast. This design maintains the clean, elegant lines you love about French tips while feeling warmer and more suited to winter months.
Try different chocolate shades for the tips—milk chocolate for subtle, dark chocolate for dramatic. The glossy finish on the tips makes them stand out beautifully. This look works perfectly for professional settings and special occasions alike.
11. Reverse Chocolate French
Flip the script by painting your entire nail chocolate and adding a thin nude or cream-colored line along the cuticle area. This reverse approach feels modern and fashion-forward. The chocolate becomes your main color while the lighter shade creates that classic French manicure structure.
The reverse technique draws attention to your cuticle area and nail beds. It creates an elongating effect that flatters shorter nails. Use striping tape to achieve perfectly crisp lines between the chocolate and lighter shades.
12. Double Chocolate French
Why stop at one chocolate shade? This design features milk chocolate tips on a dark chocolate base, or vice versa. The tonal variation creates depth while maintaining that sophisticated French manicure vibe. Both shades get the glossy glaze treatment for consistency.
Experiment with different chocolate combinations to find your perfect match. White chocolate base with dark chocolate tips feels crisp and high-contrast. Dark base with bronze-chocolate tips adds warmth and dimension to your look.
Textured and Finished Chocolate Designs
Different finishes completely transform the same chocolate shade. These textured approaches prove that chocolate glazed nails can go beyond just glossy—though that shine will always be gorgeous. Each finish brings its own mood and personality to your manicure.
13. Chocolate Chrome Nails
Apply chrome powder over chocolate gel polish for a mirror-like metallic finish that's absolutely mesmerizing. The chrome catches and reflects light in ways that regular polish can't. This high-impact look works best for special occasions or when you want your nails to be the star of your outfit.
Chocolate chrome creates dimension and movement with every hand gesture. The metallic finish feels futuristic yet warm thanks to the chocolate undertones. This technique requires gel polish and proper curing but delivers showstopping results.
14. Matte Chocolate Truffle
Trade the glossy glaze for a velvety matte finish that resembles actual chocolate truffles. Matte chocolate nails feel understated yet luxurious—perfect for those who prefer subtle sophistication. The flat finish creates a completely different vibe while maintaining that cozy chocolate aesthetic.
Apply matte top coat over any chocolate shade to transform the finish. The matte texture makes colors appear richer and deeper. Consider doing glossy accent nails for beautiful contrast, or go full matte for consistent elegance.
15. Chocolate Jelly Finish
This translucent, squishy-looking finish brings a playful dimension to chocolate nails. Jelly polish has a see-through quality that shows your natural nail underneath while still delivering color. Build up layers for more opacity, or keep it sheer for that unique jelly effect.
Chocolate jelly nails look almost three-dimensional and incredibly glossy. The translucent quality catches light beautifully and feels lighter than opaque chocolate. This finish works gorgeously on shorter nails and feels youthful and fun.
Festive Chocolate Nail Art Ideas
Holiday season calls for manicures that celebrate the festivities while staying true to your chocolate obsession. These cozy nail looks incorporate seasonal elements that make your chocolate base feel extra special for winter gatherings and celebrations.
16. Chocolate Peppermint Swirl
Combine chocolate nails with red and white candy cane accents for a design that captures holiday spirit perfectly. Paint most nails in glossy chocolate, then add peppermint swirl designs on one or two accent nails. The red and white against chocolate brown creates that classic holiday color combination.
Use striping brushes or nail art pens to create the swirl patterns. This design works beautifully for December events and holiday parties. The contrast between chocolate richness and peppermint brightness makes your manicure feel festive and fun.
17. Chocolate Snowflake Accent
Add delicate white or silver snowflakes to your chocolate glazed base for winter wonderland vibes. Keep most nails in solid glossy chocolate and reserve the detailed snowflake art for accent nails. This combination feels seasonal without being too theme-heavy.
Use snowflake nail stickers for easy application, or try your hand at painting them freehand. The white-on-chocolate contrast makes the snowflakes pop beautifully. Add tiny crystals or rhinestones to snowflake centers for extra sparkle and dimension.
These seventeen chocolate glazed nail ideas prove there's truly a perfect chocolate manicure for everyone. Whether you gravitate toward classic simplicity or love experimenting with textures and accents, your ideal winter nail art awaits. The best part? You can mix elements from different designs to create something uniquely yours.
Step-by-Step Application Technique for Perfect Glazed Chocolate Nails
The secret to salon-worthy chocolate glazed nails? A methodical approach that doesn't skip the boring-but-crucial prep work. Think of it like baking—you can't just throw ingredients together and hope for the best. Each step builds on the previous one, creating that stunning finish that makes these edible-inspired manicures so irresistible.
Here's the thing: most application failures happen because someone rushed through the foundation stages. We're going to walk through this together, addressing the tricky parts before you even encounter them.
Preparing Your Nails
This is where everyone wants to cut corners, but trust me—proper prep is what separates a three-day manicure from a three-week one. Start by filing your nails to your desired shape, whether that's almond, square, or rounded. File in one direction rather than sawing back and forth, which can cause splitting.
Next, gently push back your cuticles using a cuticle pusher or orange wood stick. Don't cut them unless absolutely necessary. Healthy cuticles protect your nail bed and help polish adhere better.
Now comes the buffing step. Use a fine-grit buffer to lightly smooth the nail surface. You're not trying to remove layers—just create a slightly textured surface that helps polish grip. Buff in gentle circular motions for about 10 seconds per nail.
Finally, wipe away all oils and debris. Use a lint-free wipe dampened with rubbing alcohol or nail cleanser. This removes natural oils that can prevent polish from bonding properly. Let your nails dry completely before moving forward.
Applying Base Coat
Choosing the right base coat matters more than you might think. If you have weak nails, go for a strengthening formula. If your nails have ridges, use a ridge-filling base. For normal nails, a standard base coat works perfectly fine.
Application technique is straightforward but important. Apply a thin, even coat that covers the entire nail surface without flooding your cuticles. Start with a stripe down the center, then fill in each side. The key word here is thin—thick coats take forever to dry and can bubble or peel.
Don't forget to cap the free edge by running the brush along the tip of your nail. This creates a seal that helps prevent chipping. Let the base coat dry for at least two minutes before proceeding.
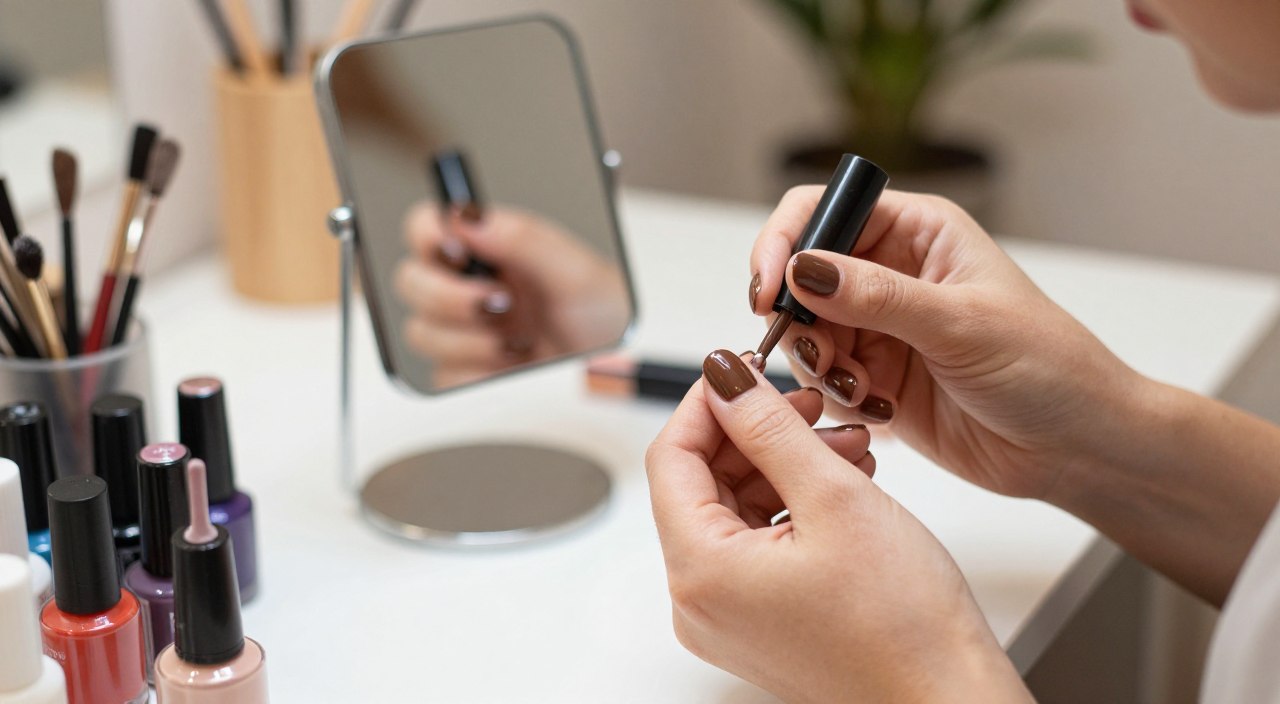
Building Color with Chocolate Polish
Here's where your chocolate dreams start becoming reality. Most chocolate polishes need two to three coats for full opacity. Darker, richer chocolates might only need two, while lighter milk chocolate shades often require three.
Apply your first coat using the same technique as your base coat—center stripe, then sides, capping the free edge. Keep it thin. Yes, it'll look streaky and uneven. That's completely normal and exactly what's supposed to happen on the first coat.
Wait at least two minutes between coats. Rushing this step causes the polish underneath to lift or bubble. Use this time to clean up any mistakes around your cuticles with a small brush dipped in acetone.
Your second coat should be slightly thicker than the first, building opacity without getting gloopy. If you can still see your nail line after two coats, add a third. Each layer should be smooth and even, with no bald spots or thick patches.
Creating the Signature Glazed Effect
This is where the magic happens—transforming regular chocolate polish into those glossy, reflective edible-inspired manicures you've been drooling over. You have several options, depending on what products you have available.
The easiest method? A high-shine glossy top coat applied generously. Look for top coats specifically marketed as "ultra-glossy" or "gel-effect." Apply a thicker layer than you would with regular top coat, really flooding the nail surface to create that glassy finish.
For an even more dramatic glazed effect, try chrome powder applied over a tacky gel top coat. Cure your chocolate gel polish, apply a no-wipe gel top coat, cure for 30 seconds, then gently rub chrome powder onto the slightly tacky surface with a silicone tool or your finger. Seal with another layer of gel top coat.
Don't have professional tools? No problem. Apply your glossy top coat, let it dry for 30 seconds, then apply a second layer. This double-coating technique creates extra depth and shine that mimics the glazed effect beautifully.
Sealing and Curing
Your final steps determine how long your manicure will last. If you're using regular polish, apply your glossy top coat in a slightly thicker layer than your color coats. Cap those free edges—seriously, don't skip this step.
The wrap-the-tip technique is crucial for longevity. After applying top coat to the nail surface, run the brush along the very edge of your nail tip. This seals the layers together and prevents the dreaded tip wear that happens within days.
For gel polish users, cure according to your lamp's specifications—typically 30-60 seconds under LED or 2 minutes under UV. If you're using regular polish, allow at least 10 minutes of careful drying time before touching anything. Quick-dry drops can speed this process.
Here's a pro trick: after your top coat dries completely (give it 30 minutes to be safe), apply cuticle oil around each nail. This rehydrates the skin and adds an extra dimension of shine to your glazed finish.
The beauty of this application technique is that it works whether you're doing a simple chocolate manicure or one of the more complex designs we covered earlier. The foundation remains the same—proper prep, patient layering, and that gorgeous glazed finish that makes chocolate nails so crave-worthy.
Take your time with each stage. The difference between "okay" and "stunning" often comes down to waiting an extra minute between coats or being more careful with your capping technique. Your patience will be rewarded with a manicure that looks professionally done and lasts significantly longer than a rush job ever could.
Pro Tips for Maintaining Your Chocolate Glazed Manicure
Here's what nobody tells you about beautiful manicures: the application is easy compared to making them last through your actual life. You've created those gorgeous chocolate glazed nails, and now it's time to talk about the real work—keeping them looking freshly done when you're opening packages, typing emails, and living your normal routine. The good news? With a few smart habits and insider tricks, your holiday nail inspiration can stay salon-perfect for way longer than you'd expect.
Think of manicure maintenance like skincare—it's not about one big effort, it's about small daily choices that add up. And honestly, once you know what actually damages your nails versus what's just beauty myth, protecting your chocolate glazed look becomes almost automatic.

Preserving the High-Gloss Finish
That signature glazed shine is what makes this look so special, but it can dull faster than you'd like if you're not careful. The biggest enemy of your high-gloss finish? Hot water and harsh chemicals. I know it sounds old-school, but wearing gloves for cleaning tasks genuinely makes a difference—dish soap and household cleaners strip away that beautiful shine within days.
Here's a trick that actually works: reapply a thin layer of glossy top coat every 2-3 days. It takes literally two minutes and instantly refreshes that mirror-like finish. You don't need to redo your entire manicure—just a quick swipe over each nail brings back that glazed chocolate perfection.
Consider keeping a travel-size top coat in your bag. Quick touch-ups throughout the week maintain that fresh-from-the-salon appearance without any hassle.
The secret to maintaining any glazed finish is treating your nails like jewelry—you wouldn't wear your best rings while scrubbing floors, right? Same principle applies here.
Preventing Chips and Extending Wear
Let's talk about the daily habits that either protect or destroy your chocolate glazed nails—because honestly, how you use your hands matters more than most people realize. Opening soda cans with your nails? That's a guaranteed chip waiting to happen. Using your nails as tools to peel stickers or scrape things? Same story.
Here's what actually extends your manicure's lifespan:
- Apply cuticle oil daily—yes, it really prevents lifting and peeling at the base
- Avoid hot water soaks for 24 hours after application—this allows everything to fully cure and bond
- Type with your fingertips, not your nail tips—this small adjustment prevents tons of wear
- Be strategic about timing—don't get your manicure right before organizing your closet or deep-cleaning your kitchen
The cuticle oil tip deserves extra emphasis. Hydrated cuticles mean less lifting around the edges, which is where most chips start. Apply it before bed and let it work overnight—your chocolate glazed nails will thank you.
Also, think about when you schedule your manicure in relation to your weekly activities. Getting your nails done on Friday before a relaxing weekend? Perfect. Right before you're moving furniture or gardening? Not so much.
Refreshing Your Look Between Manicures
Life happens, and sometimes your mostly-perfect nails just need a little refresh rather than a complete redo. For minor chips, here's a quick fix: dab a tiny amount of your chocolate polish on the damaged spot, let it dry completely, then seal with top coat. It won't be invisible, but it's way better than a glaring chip.
When your nails are showing wear but aren't quite ready for removal, try this strategy: add an accent nail design to draw attention away from any imperfections. A bit of gold leaf on one or two nails, or some subtle nail art on your ring fingers, creates a fresh focal point that distracts from minor wear on the other nails.
Sometimes it's worth refreshing just the top coat versus starting completely over. If your color is still solid but the shine has dulled, remove the old top coat with a gentle swipe of polish remover, then apply two fresh layers of glossy top coat. This five-minute refresh can buy you several more days of wear.
The reality is that perfection isn't sustainable—we all have actual lives to live. But maintaining a polished, put-together look absolutely is possible with these practical approaches. Your winter manicure doesn't have to be flawless to still look gorgeous and make you feel confident.
☕ ✨
From Hot Cocoa to Champagne Toasts...
Once you’ve perfected these chocolate tones, it’s time to plan your grand entrance for 2026.
Discover our Sparkly New Year’s Gallery →
Conclusion
Here's the thing about chocolate glazed nails—they're forgiving, versatile, and genuinely wearable in ways that so many trendy manicures just aren't. You don't need a steady hand like a nail artist or a drawer full of specialty products to make these looks work for you.
Maybe your first attempt won't look exactly like the inspiration photos you saved. That's completely normal. The beauty of this trend lies in how personal it becomes once you start playing with different shades, finishes, and accent techniques. Some days you'll want that rich, decadent full chocolate glaze. Other times, a subtle hint of shimmer or a simple metallic accent will feel just right.
The 17 variations we explored give you permission to experiment without pressure. Start with the classic looks if you're feeling cautious. Branch out to textured finishes or festive designs when you're ready for something different. There's no wrong way to wear chocolate tones on your nails this winter.
What matters most is that you're treating yourself to something beautiful that makes you feel put-together, even on the coldest, grayest days. Your nails deserve that little moment of luxury. So grab your favorite chocolate polish, set aside some time for yourself, and create a manicure that's as delicious-looking as it is uniquely yours. You've got this.
FAQ
What exactly is the "glazed" effect in chocolate glazed nails?
The glazed effect is that gorgeous, high-shine, almost wet-looking finish that makes your nails look like they've been dipped in liquid glass—or in this case, melted chocolate! It's achieved through a combination of glossy brown nail color and specialized top coats that create an ultra-reflective surface. Some nail artists use chrome powder for maximum shine, while others layer specific high-gloss top coats to build that signature glazed donut effect that Hailey Bieber made famous. The result is a luminous, dimensional finish that catches light beautifully and elevates a simple brown manicure into something truly luxurious. Think of it as the difference between regular nail polish and nails that look professionally glazed at a high-end salon.
Will chocolate brown nail colors look good on my skin tone?
Oh, absolutely—and this is one of the best things about chocolate manicure trends! Brown nail designs are incredibly versatile across different skin tones because chocolate comes in so many delicious shades. If you have lighter skin, milk chocolate or caramel-toned browns create a soft, sophisticated look that's not too stark. Medium skin tones look stunning with pretty much the entire chocolate spectrum, from warm cocoa to rich truffle shades. Deeper skin tones can rock dark chocolate and espresso browns that create gorgeous contrast and depth. The key is finding your perfect chocolate shade—warmer browns with golden undertones complement warm-toned skin, while cooler browns with subtle gray undertones flatter cool-toned complexions. Don't be afraid to experiment with different chocolate shades to find your sweet spot!
How long does a chocolate glazed manicure typically last?
With proper application and care, your chocolate glazed nails can look gorgeous for 7-10 days with regular polish, and up to 2-3 weeks with gel polish. The longevity really depends on your lifestyle and how well you maintain them—I'm talking wearing gloves for cleaning, being mindful with your hands, and applying cuticle oil regularly. The high-gloss finish might start to dull slightly after about 5 days with regular wear, but you can easily refresh it by applying a fresh coat of glossy top coat without redoing the entire manicure. One of the benefits of these cozy nail looks is that chocolate brown shades tend to be more forgiving as they wear compared to lighter colors—minor tip wear is less noticeable than with pale or bright shades. If you're using quality products and following proper prep steps (base coat, thin layers, wrapping the tips), you're setting yourself up for maximum wear time.
Can I create chocolate glazed nails at home, or do I need to visit a salon?
You can absolutely create beautiful chocolate glazed nails at home—I promise it's more achievable than it looks! While professional nail artists have perfected their techniques, the basic concept is totally DIY-friendly with the right products and a bit of patience. You'll need a good chocolate brown nail color, a high-quality glossy top coat (or chrome powder if you're feeling adventurous), and the basic nail prep tools most of us already have. The key is taking your time with each step: proper prep, thin coats of polish, and that final glossy finish. Your first attempt might not be Instagram-perfect, and that's completely fine—nail art is a skill that improves with practice. Start with a simpler classic chocolate glazed look before attempting more complex winter nail art with accents and designs. There are tons of tutorials available that break down the process step-by-step, and the community of nail enthusiasts online is super supportive and encouraging.
What's the difference between chocolate glazed nails and regular brown nail polish?
Great question! The main difference is that glossy finish and dimensional quality that makes chocolate glazed nails look so much more luxurious than standard brown polish. Regular brown nail polish can sometimes look flat or one-dimensional, while the glazed effect creates depth, luminosity, and that signature shine that catches light from every angle. It's similar to the difference between matte chocolate and a glossy chocolate glaze on a dessert—same base color, completely different visual impact. The glazed technique often involves layering products strategically: a rich brown base, sometimes a chrome or shimmer layer for dimension, and then that ultra-glossy top coat that creates the wet-look finish. This sweet-inspired nail polish approach transforms what could be a simple brown manicure into something that feels special and intentional. The glazed effect also tends to look more expensive and polished, even though the actual process isn't that much more complicated than regular polish application.
Are chocolate glazed nails appropriate for professional or formal settings?
Absolutely! This is one of the reasons chocolate glazed nails have become such a popular trend—they're sophisticated enough for professional environments while still being current and stylish. Brown nail designs, especially in chocolate tones, read as neutral and polished in most workplace settings. Unlike bright neon or heavily embellished nail art, a classic chocolate glazed manicure is understated elegance that won't raise eyebrows in conservative offices. The glossy brown nails look intentional and put-together without being distracting or overly trendy. For formal events like winter weddings or holiday parties, chocolate glazed nails are perfect because they're luxurious without competing with your outfit. If your workplace has strict appearance policies, you might want to stick with the classic chocolate glazed looks rather than versions with dramatic metallic accents or elaborate winter nail art, but the basic concept is definitely office-appropriate. Think of them as the sophisticated older sister of flashier nail trends—elegant, timeless, and universally flattering.
What should I do if my chocolate nail polish looks streaky or uneven?
Oh, streaky brown polish is frustrating, but totally fixable! First, make sure you're using thin coats—thick applications are the number one cause of streaking with darker polishes like chocolate browns. It's better to do three thin coats than two thick ones. Also, check your polish consistency; if it's gotten thick or goopy, add a few drops of nail polish thinner (not nail polish remover—that's different!) to restore the proper texture. When applying, use light pressure and avoid going over the same area repeatedly while it's still wet, which can drag the color and create streaks. Some chocolate brown nail colors are just inherently more pigmented and smooth than others, so if you're consistently having trouble, it might be worth trying a different brand or formula. Quality matters with edible-inspired manicures—investing in a well-reviewed chocolate polish makes the application so much easier. And remember, the final glossy top coat can actually help disguise minor imperfections in the color underneath, so don't stress too much about perfection at every stage!
Can I add nail art to chocolate glazed nails, or does that ruin the glazed effect?
You can definitely add nail art to your chocolate glazed base—in fact, some of the most gorgeous holiday nail inspiration comes from combining that glossy chocolate background with creative accents! The key is being strategic about placement and technique. If you want to maintain maximum glazed effect, add your nail art on just one or two accent nails while keeping the others as classic glossy chocolate. Things like gold foil, delicate snowflakes, or thin metallic stripes can enhance rather than compete with the glazed finish. Just make sure to apply your final glossy top coat over the entire design (including any nail art) to maintain that unified glazed appearance and seal everything together. Some cozy nail looks combine matte and glossy finishes intentionally—like matte chocolate with glossy designs on top—which creates beautiful contrast. The winter nail art possibilities are honestly endless! Don't feel like choosing chocolate glazed nails means you're locked into simplicity. Start with a basic look, and as you get more comfortable with the technique, experiment with adding those personal touches that make the manicure uniquely yours.
Do I need special lighting or equipment to cure chocolate glazed nails?
That depends on the products you're using! If you're working with traditional nail polish (not gel), you don't need any special equipment—just patience while your nails air-dry completely. Regular polish and standard top coats will dry on their own, though you might want to use a quick-dry spray or drops to speed up the process. However, if you're using gel polish or certain chrome powders that require gel top coats, then yes, you'll need a UV or LED lamp to cure (harden) each layer. LED lamps are generally faster and more popular now—most cure each layer in 30-60 seconds. The good news is that quality LED nail lamps have become really affordable (you can find reliable ones for under $30), and they're a worthwhile investment if you plan to do gel manicures regularly at home. For creating that signature glazed effect with regular polish, you absolutely don't need special equipment beyond your standard manicure tools. There are plenty of amazing glossy top coats that air-dry to a beautiful shine without any curing required, making chocolate manicure trends totally accessible whether you have professional equipment or not.
Why do chocolate brown nails feel more appropriate for winter than other seasons?
There's something about chocolate tones that just feels cozy and right when the weather turns cold—it's almost like our aesthetic preferences shift with the seasons! Brown nail designs align with the earthy, warm color palettes we naturally gravitate toward in fall and winter: think cozy sweaters, warm beverages, and comfort foods. Psychologically, brown tones are associated with warmth, comfort, and security, which are exactly the vibes we're seeking during colder months. The chocolate connection adds that sweet, indulgent element that feels especially relevant during the holiday season with all its delicious treats. Plus, glossy brown nails complement winter wardrobes beautifully—they work with the deep jewel tones, neutrals, and metallics that dominate cold-weather fashion. There's also something about the way that glazed finish catches the light on gray winter days that feels especially magical and luxurious when we need a little brightness. That said, if you love chocolate glazed nails, there's no rule saying you can't rock them year-round! But there's definitely something particularly satisfying about embracing these sweet-inspired nail polish looks when it's cold outside and you're craving something visually delicious.
Post a Comment
For any clarifications or additional information, you are welcome to ask in the comments.